Is your computer acting stubborn and not turning on, even though the motherboard light is on? It’s a bit frustrating, but no worries—I’m here to help you figure it out.
If your computer is being a bit uncooperative, the power button or the wiring connecting it to the motherboard might be causing the issue. Take a look at your motherboard to see if there’s a built-in power button. Let’s solve this puzzle together!
In this article, we’ll explore common causes behind this issue and guide you through step-by-step solutions to get your PC up and running again.
What Does It Mean When the Motherboard Light Is On but pc won’t turn on?

When my motherboard light flickers to life, it’s the PSU doing its job, pumping power to the heart of my computer. But here’s the kicker—most motherboards have a bunch of LEDs, each with its own rainbow of colors, ready to glow when something’s not quite right inside.
Take, for instance, the red LED. It’s like the motherboard’s way of raising an eyebrow, signaling trouble with the internal bits or a case of not plugging things in quite right. In simple terms, it’s pointing fingers at hardware buddies like the RAM, CPU, and GPU.
Sometimes, that light show could be because of a CMOS battery playing dead or a hiccup in the boot-up process. No need to panic, though! The internet store is just a tap away if I’m missing the tools or just a few crucial pieces. Time to get this tech tango back on track!
Why Won’t My Pc Turn On Despite Power?
When my PC has a bit of juice (those hopeful lights on the hardware), I like to play detective with built-in checks like POST and beep codes. It’s like my computer’s secret language to tell me what’s up when things aren’t going as planned.
So, these POST codes, little two-digit signals, like secret handshakes, decode error messages. Some devices even flash the code on the screen, and I’m like, “Challenge accepted!” I compare it to the user guide to start my little diagnostic adventure.
Now, if I want to use my ears instead of my eyes, there are beep codes. It’s like my computer’s version of Morse code, but it’s all about the beep frequency instead of dots and dashes. For instance, if my graphics card decides to play hide and seek, my computer might give me three quick beeps. Time to decode the beep talk and get this tech puzzle solved!
Top 7 Ways to Fix If A PC Won’t Turn On (6th Step is Important):
So, here’s the deal: my motherboard light is shining bright, but my PC is not playing ball. Seems like the power button or the internal wiring is throwing a tantrum. And, oh joy, hardware issues can also be in the mix, adding another layer to the puzzle.
Now, the odds of something going wonky are pretty high because these warning systems love to speak up when hardware decides to take a break. Time to put on my troubleshooting hat! First up, I need to check if my motherboard has a secret built-in power button. If I find it, I’ll give it a shot just like the regular power button. If my computer boots up without a hitch, I’ve cracked the code—it’s a post-boot-up hiccup.
But, hey, if this sneaky built-in button is playing hide and seek, no need to hit the panic button. The steps I’ve got below are like my secret weapon—no matter what, they’re my go-to for jumpstarting the system. Crisis averted!
Step 1: pc won’t turn on. Checking the Power Supply: (3rd step is important )

If your system receives power, indicated by the LEDs on your PC’s internal components lighting up, you may proceed to Step 3. If not, let’s begin by addressing the cables connected to your wall.
- Test the wall outlet to ensure it is active by plugging in a device (such as a lamp) that you know is functional and checking if it operates correctly.
- Ensure any surge protector or power strip is properly plugged into the outlet and the power switch is turned on. Plug other devices into the power strip and verify if they function as expected.
- Double-check that the on/off switch of your PC’s power supply is in the “on” position.
- Confirm that the power cable of your PC is securely plugged into both the power supply and the wall outlet, as it can loosen over time.
Alright, let’s break it down in simpler terms:
So, now it’s cable-testing time! Get to know your PC power cable—it’s also called a C13 cable. Once you’ve made sure your PC is plugged into the wall, here’s the next move.
If your desktop and monitor share a cable, try switching the monitor cable with the PC cable to see if the monitor turns on. If not, give your PC a shot with the cable that was originally powering the monitor. No spare cables? No biggie, just grab a new C13 cable. But, important tip: make sure it’s a similar size because some power-hungry PCs need a chunkier wire.
Once you’ve ruled out the power cord and wall socket as the troublemakers, it’s time to peek inside your computer case and check out the cables in there. Let the cable adventure continue!
Step 2: Verifying Motherboard Connections in case pc won’t turn on:

Next, examine the connections on the motherboard, including the power button, reset switch, and front panel connectors. Ensure these cables are correctly plugged in and seated properly.
Step 3: If the PC won’t turn on, check Internal Wiring:
Now, it’s time for a close-up look inside my computer setup to ensure all cables are snug and doing their job. If you’ve got a prebuilt system, just a heads up—cracking it open might mess with your warranty, so it’s smart to touch base with the folks who made it before you dive in.
First things first, unplug the cable linking my PC’s power supply to the wall outlet. Safety first! And let’s not forget, say bye-bye to any external gadgets hanging around, like:

- Keyboards
- Mice
- External hard drives
- Monitor cables plugged into your computer. USB devices or display connection cables can occasionally cause power issues.
So, if my PC manages to kick off without any extra gadgets attached, I’ll start plugging them in one by one, playing detective until I figure out which one’s causing the ruckus. Then, it’s a game of trial and error—booting up without the troublemaker or trying out a replacement.
If the problem’s still giving me grief, it’s time for a little surgery. I’ll unplug the computer, crack open the case, and dive into the nitty-gritty. Every computer’s a bit different, so I’ll follow the handy paper guide to navigate the insides.
Once I’ve got the case open, it’s like a cable treasure hunt. I’ll check every connection between the power supply and my PC’s bits and bobs. If anything seems a bit loose, I’ll give it a snug fit. And, hey, if my power supply is one of those cool modular ones (where I get to pick and choose my cables), I’ll double-check that everything’s cozy on the power supply side too.
With all the connections getting the green light, I’ll fire up the PC. If the problem’s still playing hard to get, it’s time to unplug every power cable connected to my components. Yep, that includes the 24-pin and CPU power cables on my motherboard, the extra power cables running to my GPU, and even the SATA and Molex power buddies hooked up to storage and other extras. Let the cable unplug-a-thon begin!
Refer to the comprehensive supply guide for more detailed information on power supply connections. Once all power cables have been unplugged from the PSU, reseat the motherboard and CPU power cables, plug in your PC, and check if your system powers on.
Look for fans spinning and lights shining on your hardware as indicators. If your PC powers on at this point, great! Power down the system and start reconnecting the power cables to each hardware component, testing until you identify the piece of hardware causing the problem.
If you need guidance on which hardware requires a power supply connection or have questions about the correct connections, refer to the introductory guide on PC building.
While inspecting the inside of your case, be vigilant for anything that could cause an electrical short. For example, motherboards are fastened directly to the case without the appropriate standoffs or Molex connectors with pins that make contact with the chassis.
This is unlikely to be an issue with prebuilt PCs, but it’s always worth checking for and not always immediately apparent. If you have gone through all the above steps and the component status LEDs are still not showing any activity, you may have a faulty PSU.
If you have a spare power supply that you know works, connect the CPU cable and 24-pin motherboard cable from the new PSU to see if it successfully powers your motherboard. If so, the issue was probably with the prior PSU. For further information, get in touch with the company that made the problematic unit.
Step 4: Examining the Graphics Card if the computer won’t turn on:

If you have a separate graphics card installed, remove it from the motherboard and try booting up the computer using the integrated graphics (if available). If the PC starts successfully, it suggests a graphics card problem requiring further investigation or replacement.
Step 5: Checking for External Device Interference:
Disconnect all external devices except for essential peripherals like the keyboard and mouse. If the computer won’t turn on, check if any external device is causing the interference.
Your system might be receiving power, as seen by lights on the internal hardware, yet it still might not be turning on properly. The procedures should be followed if your system is still not responding when the power button on your case is touched or if it is turning on briefly before shutting down again.
- POST and Beep Codes:
Although identifying the exact cause of your PC’s failure to boot can be challenging, built-in tests are available to assist you. Power On Self Test (POST) codes and beep codes are visual and audio cues motherboard manufacturers use to communicate the results of internal hardware tests.
These codes can provide valuable insights into any hardware issues preventing your PC from powering on. POST codes typically consist of two numbers, indicating the specific point during the boot process where a hardware problem occurred. This information can help identify the source of the issue.
For example, troubleshooting your RAM would be a good starting point if the POST code points to a memory initialization error. Many motherboards feature a hexadecimal display that shows the code and guides the diagnostic process.
If your motherboard lacks a built-in display, you can use a POST test card that fits into a PCIe slot and displays the code. Beep codes serve the same purpose as POST codes but use audio signals instead.
You may hear a series of beeps when you power up your PC. These beeps indicate specific issues, such as the absence of a video card, suggesting you should begin by reseating your GPU.
It’s important to note that each motherboard manufacturer uses a different system of codes. Guide to your motherboard documentation or search online for the specific codes used by your motherboard manufacturer to identify the problem you are facing.
- Motherboard BIOS Updates
So, if I’m still chasing that elusive POST code after all the steps I’ve taken, it’s time to make sure my motherboard’s brain—the operating system—is up to speed.
Even if my PC seems a bit stubborn, there’s hope. I can give the BIOS a little update to the latest version. The steps might play out differently depending on who made my motherboard, so I’ll dig into the motherboard documentation or do a quick online search to ensure I have the freshest BIOS version on the block.
Now, fair warning: this might not be the move if my computer was cruising smoothly and then suddenly hit a roadblock, or if I’m working with a prebuilt system.
But, here’s the twist: if I’m piecing together a PC that’s not kicking into gear, especially with an older motherboard, double-checking that I’m rocking the newest BIOS version is a must. Time to give that motherboard a little brain boost!
Step 6: Power Button (Most Important Step To Consider):
If your PC isn’t turning on, but the motherboard light is on, one possible cause could be a faulty power button on the case or the wires connecting it to the motherboard. Here’s what you can do to troubleshoot the issue:
- Make sure the motherboard has a power button on it. Not all motherboards have this feature, so refer to your manual if you’re unsure or having trouble finding it. The onboard power button can help determine if the problem lies with the case itself.
- If your motherboard does not have an inbuilt power button, you can jump-start the machine with a screwdriver.
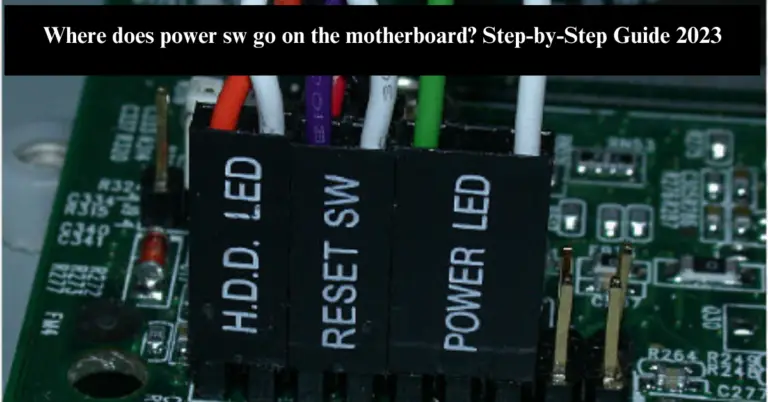
- Find the power switch headers on your motherboard. These small headers are usually labeled PWR_SW, with + and – symbols. If the power button from your case is already connected to these headers, you’ll need to disconnect those cables.
- If you can’t find the power switch headers, consult your motherboard documentation; their labeling can be tricky. Ensure that the 4/8 CPU power and 24-pin motherboard power cables are correctly connected, and the power supply unit (PSU) is switched on and providing power.
- Gently touch a metal screwdriver to the two power switch header pins. If everything is connected correctly, the system should turn on. This action simulates pressing the power button on your case or using an onboard power button on the motherboard.
- If your system powers on when using the onboard power button or jumping the headers with a screwdriver, the issue may lie with your case’s power button. In this case, you can use the reset button as a temporary solution.
- Locate the reset switch headers near the power button headers. If your case has a reset button, it’s likely connected to these headers.
- Replace the cables from the power button headers with the reset button. The reset button operates similarly to the power button, and if the problem is with the power button in your case, wiring the reset button to the power switch headers may resolve the issue.
- Keep in mind that you’ll need to press the reset button instead of the power button to turn on your computer. This is only a temporary solution, and contacting your case manufacturer for a more permanent fix is advisable.
- Remember to consult your motherboard manual for specific instructions and contact your case manufacturer for further assistance.
For further details, read What does yellow light mean on the motherboard?
Step 7: Check the IC Fuse:

A blown fuse can be a potential cause for your computer won’t turn on correctly. To check for any signs of a blown fuse, inspect the power supply unit (PSU) for any burning smells.
If you detect a burning odor, one or more internal components of the PSU have likely blown. In such a case, you must identify and replace the damaged components with new ones.
Remove any unnecessary cables, such as those connected to an unused CD-ROM drive. However, it’s important to note that this troubleshooting method may be challenging for individuals without sufficient computer knowledge.
If you’re unsure or uncomfortable with performing these steps, you should take your computer to a specialized repair center where professionals can test and diagnose the issue.
Conclusion:
Dealing with a motherboard that won’t turn on, even with the motherboard light on, can be super frustrating. If you’re stuck in this situation, check the wires connecting the power button to the motherboard—they might be the troublemakers. The good news is, I’ve got 7 simple ways to try and fix the problem. Give them a shot, and let’s see if we can get your computer up and running again.
Note: If none of these solutions prove effective, getting help from an official technician who can further diagnose the issue may be necessary.
FAQs:
Q1. Why won’t my computer turn on even though the motherboard light is on?
Your computer may not be turning on even when the motherboard light is on if you have a bad CMOS battery. The BIOS chip may not receive enough power if the battery is damaged or outdated, which would prevent the PC from turning on.
Q2. Can a faulty power supply cause the motherboard light to stay on but prevent the PC from turning on?
There are various potential causes for a computer won’t turn on even though the motherboard light is on. One possibility is that the PC isn’t getting enough power from the power supply. Another possibility is that the motherboard itself has an issue.
Q3. How can I determine if my motherboard is causing the issue?
Inspect the motherboard for physical damage, such as bulging or leaking capacitors. Resetting the CMOS settings on the motherboard can also help resolve any configuration-related issues.
Q4. Why should I disconnect external devices when troubleshooting a pc won’t turn on?
External devices connected to your PC can sometimes interfere with the startup process, causing conflicts or power issues. Disconnecting all non-essential external devices helps to focus the troubleshooting process on the core components.
Read Also:
- 3-1 Pin Area Motherboard: Revealing Its Power LED Front Panel Connector
- Where Can I Sell Motherboards? Exploring Your Options 2023
- Does The Motherboard Matter For Gaming? Let’s Explore The Truth 2023
- Motherboards Inc. Manufactures Computer Parts: The Company’s Total Revenue Is’ – 2023
- How To Ship A Motherboard? All About Motherboard Shipping 2023